
Craft Room Organization is in the Details!
A lot goes into a new craft room organization project. It isn't just the big things of moving furniture around, and choosing storage containers. It's usually the small details of how we deal with individual products that make or break a new organization plan. Today, I'm going to delve into a few of the finer details of my new craft room organization plan to show I'm making this scheme work for me.
[Disclosure: This site is a participant in the Amazon.com affiliate program. Some links on this site are affiliate links that pay this site a commission when a purchase is made after a click.]
Labeling is key element of my craft room organization plan. I label practically everything that doesn't move out of my way with my Dymo Labelmanager 160. (One of these days, the cat is going to take too long of a nap on her favorite spot by my craft room window and wake up labeled.)
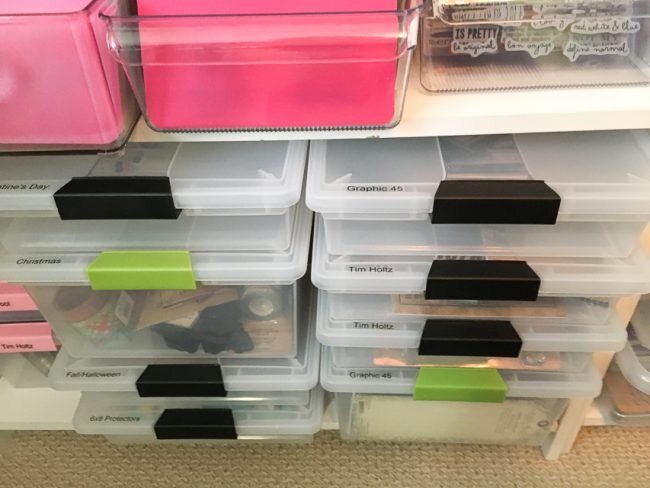
But before I can label, I have to categorize items to label. There are three major ways that I divide things up: product type (such as "dry adhesives"), manufacturer, and theme. Below, you can see examples of those last two in some of my embellishment boxes from on my papercrafts shelves.

Labeled Craft Storage Boxes
I also categorize in where I put my boxes. I have tons of these storage boxes. I try to put similar ones together. So, above, my American Crafts sub-brand boxes are together. And below, my "vintage" look boxes - Tim Holtz and Graphic 45 - are shelved together for convenient use.
When labeling, it matters not just that I label a box, but where I label it. The boxes above are labeled in a usual spot on the middle of the front of the box. Since they sit on a high shelf, that is visible from my seat in my desk chair. But the boxes below, which sit on the bottom shelf, are labeled on the front corner of the lid, which is more visible when I'm seated in my chair. A label is no good if you can't actually see it!
Labeled Craft Storage Boxes
One other thing is different in the second photo of the bins as well. The labels are clear instead of white. Since I'm viewing the boxes in the lower picture from close up, it's easy to read them without the high contrast white background. But I need that background on the bins that are higher up and further away.
The clear label tape is also useful for creating labels that are more aesthetically pleasing than just a strip of label tape. The ones below are made using print & cut on my Cricut Explore machine on printable vinyl. I create the blank labels, and then use clear label tape to label over them when I fill the bin. I also used the clear label tape on file folder labels to label all of my small drawers that sit over my Cricut machine on my desktop.
Pretty Craft Box Labels
Sometimes, something is already labeled, but in the wrong place. When some of these dies were placed in my storage rack on my desk, the end that showed was not the side that was labeled. So I just labeled them myself.

Labeled Dies
Drawers make for great storage, but have one downfall - we end up looking down on our products, a direction that they weren't usually designed to be viewed. In some cases, such as with this embossing powder and glitter, clear containers make that not a problem. But when you have multiple things that look the same but are actually different...such as all this white looking embossing powder....labels are in order. Using a clear label allows the label to be visible while also allowing the container's contents to be seen.

Labeled Embossing Powder
Labeling doesn't always mean a labeler, however. These Distress Stains are labeled 1/2" round circles punched out of address labels, which were then colored with the stain in the bottle and stuck on the lid.

Labeled Distress Stains
Some things don't work with simple labels though - like these Distress Re-inkers. Jennifer McGuire came up with these ingenious rings that you can print with a pdf download from Ranger's under-appreciated "Organize Your Ranger Products" page. The page contains color charts and labels that you can use to organize and track your purchases of all of the different Ranger product lines, and create color swatches to help you choose colors to use for projects.
I printed my rings on the same heavy cardstock that I am using for my inserts in my stamp folders, and punched them with a 1/2" punch and a 3/4" punch. I punched the whole sheet at once even though I don't currently own all of the re-inkers, and am saving the extras in a small zip bag to be used as I buy more colors.

Labeled Distress Reinkers
There's no question that us crafters have some difficult shaped things we need to store. One of my favorite things to use is 3M Command hooks to hang things up. You saw some of them in action in my previous article, holding my rings of small templates on the side of my bookcase, and holding my apron the back of my door. But I also use them for holding my Cricut mats on the end of the bookcase near where my machine sits. They are out of the way, but easy to grab to use!

Cricut Mat Storage
I also use my Command hooks over in my paint area. These plastic cups (some of which I drilled holes in to hang on the hooks) are the perfect way to keep my paintbrushes organized and accessible.

Hanging Paint Brush Cups
Paper scraps are another difficult item to organize, and one a lot of people struggle with. I don't like mixing my paper scraps together, but instead prefer to keep my scraps with the collection they belong to. I have found a way to do that without making my vertical paper files a mess by using inexpensive sheet protectors. When I have small to medium size scraps from a collection, I collect them into one of these sheet protectors and then just file the protector along with the rest of the papers from that collection. There's no extra cutting needed, and I always know what collection the scraps are from or if I have a scrap left of a certain paper.

Paper Scrap Storage
Sheet protectors are also a great way to store stencils and keep them from getting damaged or tangled together. I use old page protectors to hold my 12x12 stencils, and then file them in my vertical files on my bookshelf. They're super easy to flip through to find the one that you want stored this way! This is a great way to recycle page protectors that have damaged bindings on them.

Stencil in Page Protector
I hope that I've inspired you on how to handle some of your craft room organization challenges! What is your biggest organizing challenge?