
Organization | Tips for Redesigning Your Scrapbook Area
The start of a new year is a time that many people - not just scrapbookers - start thinking about organizing, cleaning, and purging their spaces. For me and my scrap room, this process always starts way before January. I'm an absolute wimp when it comes to cold temperatures and gray skies, so as soon as it starts to get even a touch chilly outside I retreat indoors to my warm, cozy spaces. The problem is that after I spend just a few weeks in those spaces, I start itching to rearrange them and try something new. I guess I just get tired of looking at the same old surroundings!
I started plotting and planning my scrap room revamp in late October, and then after waiting to have time to make the trip to IKEA (the closest one to me is about four hours away) I finally started the actual makeover process in early December. It took about a month of work interspersed between my regular job, family gatherings, and Christmas prep and celebration, but I'm finally finished and am thrilled that my scrapping space now looks like this!

I've got a full tour posted on my personal blog (where I'll show the scary, not-so-perfect parts of my room, too - trust me, it still has its warts!), and I've also linked up posts showing how this room has changed in the two and a half years that we've been living in our current house. It definitely didn't all come together at once!
I've also got a few tips to share here for those of you who are also thinking of tackling your crafting spaces - or any room in your home!
Don't think it all has to get done at once.
I mentioned earlier that it took me nearly a month to complete finish my scrap room's overhaul. During that period I worked in short bursts as I had time: 5 minutes here, 15 minutes there, and a couple of times for an hour or so at a stretch. It's unusual for me to have any longer than that to devote to a project between my day job, trips to the gym, grocery shopping, cooking dinner, cleaning the house, and all those other things that go along with everyday life. I learned the value of working in short bursts many years ago when I discovered Flylady's system of housekeeping, and while I don't follow every part of her method (I just can't stand wearing shoes in the house), her 15 minute cleaning and work sessions truly helped me get my life together in many areas.
The trick to working on a project like this in small increments is to take some time at the beginning to plan things out. What needs to move first? Do you need to clear things like bookcases before you can move them (if so, do that in small increments, too, and put things back on the shelves as quickly as possible to avoid creating an avalanche of stuff)? When do you need to assemble new furniture pieces, if any? Should you do it now, or will it be easier to move the new items around in their flat packs before assembling them in their final homes? Take a little time make your plan of attack before diving in headfirst.
Even with all the planning ahead, there were still a couple of times that my room looked like a natural disaster had occurred, and I sat in the middle of the floor, despairing of ever getting it finished. You're likely to go through these times, too, and the best way to move past them is to get up, set a timer for 15 minutes, and keep working in those same small increments. I promise you'll eventually get there!
Don't think it has to be perfect
I really don't think that there is such a thing as the perfect scrap space. Scrappers are always bringing in new supplies, creating new albums, and learning new techniques that require new tools and new storage and working spaces. You're learning and growing and changing in this hobby, and your space will inevitably grow and change with you. Embrace that and let your space evolve as your needs change. If you find things that annoy you about it, make a list. Eventually that list will shape up into something that will help you redesign your space to better suit your workflow.
Don't think you have to spend a fortune
I don't have a room filled with custom cabinetry and Pottery Barn Project Tables, but I will admit that I do have a fair number of large pieces from IKEA that make my space work. When I started this room two and a half years ago, I had saved up for a single 5x5 Expedit shelving unit from IKEA and my large Madison Trestle Desk from Target. I didn't add any other pieces for another year, when I added the second Expedit. The narrow Expedit (the "corner" unit) and the Alex carts (more on those in a bit) came a full year and a half after that. While all of those pieces do add up to a small sum, I spread the expense out over time and allowed my space to grow with me. My advice is to start small (but not too small- more on that later, too) and build slowly, adding pieces as you find them on sale or save up for them.
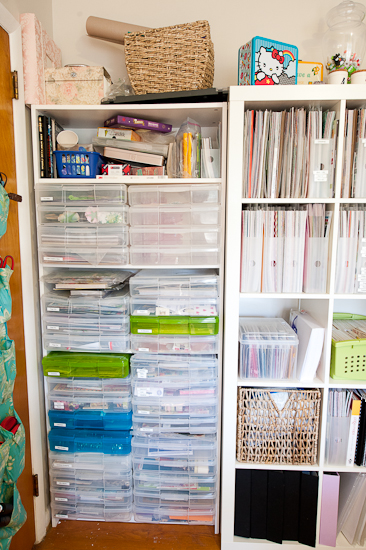
You'll also see a mix of inexpensive storage items (some are downright cheap!) mixed in with a few pricier options. Take this section of one of my bookcases, for example.
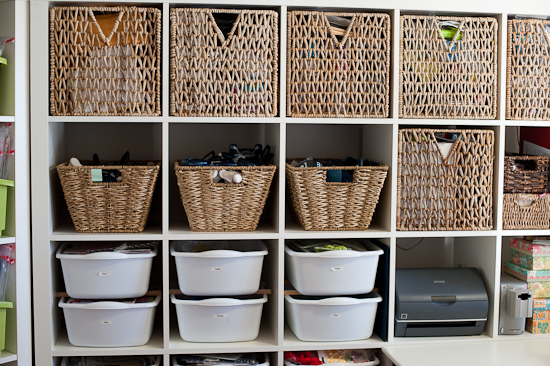
The larger Pjas cube baskets from IKEA (about $16 each) are my more expensive storage options. I do have several, but I've acquired them over the years. The medium sized baskets that hold my punches are actually repurposed from another part of the house. I'd stopped using them there, so I brought them into my scrap room. The white bins that hold my embellishments sorted by color are the cheapest storage pieces of all - they're actually white plastic dish tubs from Target that cost $2.25 each! And before I got to this stage of my scrap room storage, I went through a plethora of even less expensive options like cardboard boxes and recycled paper shopping bags (think Bath and Body Works).
Building your dream scrap space definitely doesn't have to be a budget breaker!
Do choose pieces that multitask
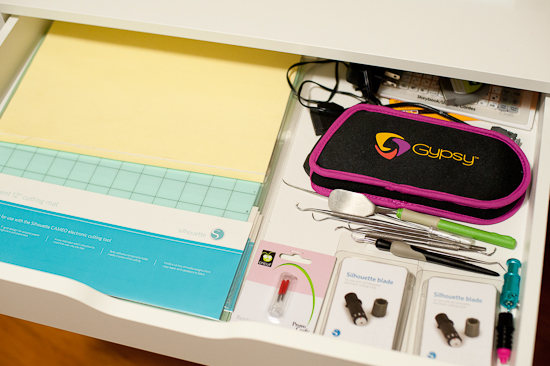
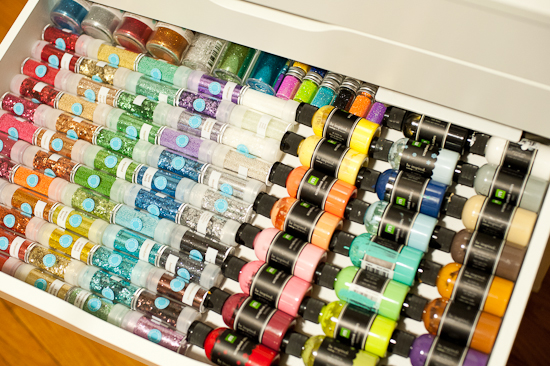
One of my favorite new additions to my scrap room is this pair of Alex carts (also from IKEA).

I purchased them because I needed something for my Cricut Expression and Silhouette Cameo to sit on so I could get to them easily when I wanted to use them. The tops of these carts are the perfect size for that, and the amazing bonus is the amount of drawer space they have underneath. The drawers are shallow and flat, perfect for cutting mats, paint, glitter, ink, and host of other tiny items.

Do leave room to grow
This tip may seem at odds with my earlier advice to start small, but I promise it isn't. Instead, it's a matter of planning. When you're looking at how much paper storage you'll need, for example, plan for those new purchases that you know you're going to bring in. There's not a scrapper alive who doesn't enjoy a little shopping now and then, after all! The trick is to plan for a little growth, but not go overboard.
Remember those Alex cards I talked about earlier? When I was showing the contents of the drawers, I didn't show the bottom two that look like this.

Yes, that's glorious, free, empty space! But only two drawers worth, which should be just enough. And if you're wondering what going overboard with extra space would have looked like, it would probably have been me buying a third cart. Two, in this case, is plenty of room for me.

When I purchased these baskets ($4.99 each at Target) to hold my kits, I bought two more than I needed at the time. That turned out to be a great choice, because now I have one free to hold the supplies for my current projects, and the other was pressed into service to hold paper scraps. In this case I grew into those baskets pretty quickly, so I was glad I'd planned for a little extra room!
Do use what you have
So far I've shown the newer pieces that I purchased specifically for this space, but there are also a fair number of pieces that have been repurposed. For example, when we moved, our new entry didn't have room for this large table that used to sit by the door at our old house. It made a great addition to my scrap room, though!
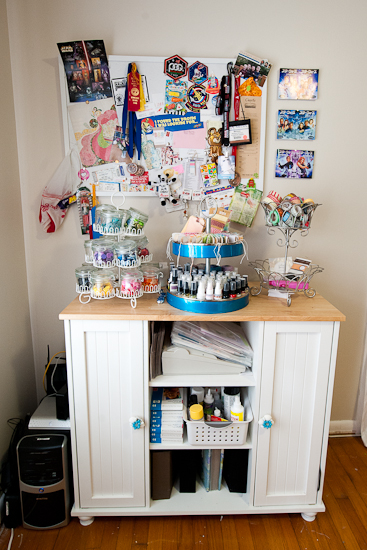
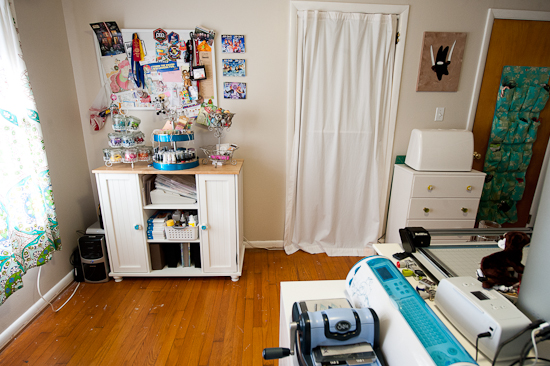
I've had this dresser since I was a baby, and when I moved into this space I repainted it to use as a stand for my sewing machine (the drawers hold unfinished sewing projects and supplies). I also replaced the knobs with several pretty new ones that I found on clearance at Anthropologie - their sale bins sometimes hold a treasure trove of decorating items!

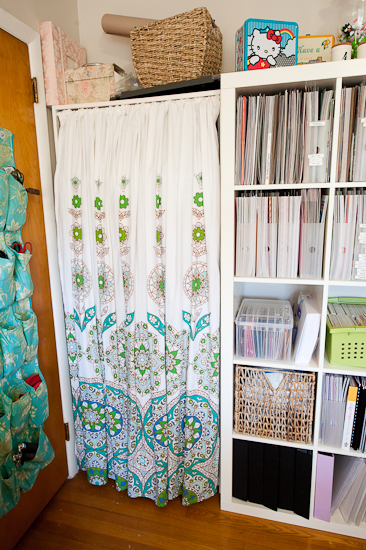
This bookcase is nearly 10 years old and has moved house a couple of times. It's one of the cheap ones from Walmart, but it's the perfect thing to have nestled right behind the door. Behind the curtain (that I hung with a tension rod) you'll find boxes of unfinished projects and other assorted items.
Do make it yours
You may have noticed the Star Wars prints and the Ninja Bunny painting in some of the photos I've shown thus far. I love finding little things like that to personalize my space, and I think it's one of the most important things you can do to make your scrap room an inviting and cozy place that you'll want to spend time in. Whatever your passion is - sci-fi, horses, or teacups, for example - make sure it's represented in your crafty space.
Hopefully some of these tips will help you as you rework your current crafty space or perhaps plan a new one!
-Melissa Stinson