
Have Fun: No Die Cut System Required
Today Scrapbook Update once again welcomes May Flaum as guest blogger. If you are scrapping with some holiday spirit, check out May's previous post on Scrapbook Update about Choosing Holiday Scrapbook Supplies.
May Flaum has been published in numerous magazines and is the co-author of Paper + Pixels: Scrapbook Layouts. She is a Big Picture Scrapbooking instructor, outgoing education coordinator for the Fiskars Crafts website, and a design team member for Scarlet Lime kits. Over the years she has taught classes around the United States as well as managed a scrapbook store, been on design teams, and done freelance work with various companies. You can find her blogging most days on her website.
I have never even considered getting any kind of die cutting system for myself, and that's the way it's going to stay.
That's a bold statement, I know. In fact sometimes when people find out I don't have anything - no Cricut, no Slice, or anything else - their eyes go wide. It's as if creating without such a device is inconceivable. Oh, they've tried to convert me and it just has not worked. I'm not interested.
To be clear, I'm not suggesting that nobody should have them. I know teachers (craft and school), card makers, and other crafters who truly get their money's worth out of every design and font. However, I see too many scrapbookers feeling pressured to invest in a system, to upgrade to the newest stuff, and thinking that they truly need some expensive system. I believe you can have just as much fun never having any kind of die cutting system, and today I'll explain why I’m happily abstaining.
We could discuss the pros of owning such a system - and believe me I realize that there are good reasons to own one. Instead today I'd like to give you five reasons I am very happy living without.
1. Let's get the money subject out of the way. If I wanted to get a healthy set of images and fonts as well as a machine of any kind $300 - 500 would be my average investment to get started. I priced out a couple of different options and no matter how you cut it, it's quite an investment - and from what I can imagine one that continues to eat up budget as new goodies come out. When I picture the $500 worth of letter stickers, rub-ons, and other items I'd imagine replacing by using a die cut machine. I'd rather have the product.
I know for some the argument that the font will pay for itself and that you won't run out of letters is very valid, but I don't see buying $50-$100 worth of the same alphabet sticker font ever- so that doesn’t ring true to me.

2. I like the challenge of making the sizes and colors of what I have on hand work. Oh sure, it'd be cool to be able to have a 3" high lilac cardstock butterfly or the perfect color and size of aqua letter stickers on command, but using my punches, hand cutting something or making an existing sticker work is fine by me.
3. Creating by hand is so satisfying. It is a huge reason I won't go completely digital - I like creating with my hands and not just clicking buttons. I have always hand-cut titles and embellishments - first it was because nothing existed, then because it was economical, and now because I enjoy it!
4. I'm not willing to give up space in my craft area. You might laugh- but I'm very serious. I have a hard enough time allowing paper punches to hang out, but the idea of some piece of machinery and accessories coming into the mix makes me twitch. Call me silly - but I would rather have ribbons and glitter and pretty things surrounding me. The computer and printer is bad enough.
5. Digital supplies rock! I can find, alter, and print just about anything I want thanks to amazing digital scrapbook designers. So when my paper stash fails to yield what I need, I can simply create a hybrid page that gets the job done to my satisfaction. Whether I buy a kit or just print with a font I've already got - I'm covered.
Now that I've told you why I choose to create without die cut assistance, I'd like to show you two layout examples.


Supply List: American Crafts Letterbox line rub-ons, American Crafts Welcoming Card Ribbon, American Crafts Warm Wishes Letterbox Paper, American Crafts Pastel Cardstock, Making Memories Brad, Jenni Bowlin Studios scalloped card, Maya Road Pink Pearl Flower Trinket Pins
First I have this "Carousel Bliss" layout to share. The Letterbox line from American Crafts is a current favorite, and at $2.99 the American Crafts Parcel Letterbox Accent rub-ons that go with this are too good to resist. I have seen die cut options for flowers and butterflies before - yet I find myself happy to use designs that coordinate with a line of product.

My title was created by printing on cardstock and cutting out the letters (French Script font). I keep a ruler in my scrap space so that I can approximate how high I want titles to be (printed off the computer) and that's how I knew how big to make this title. I find cutting titles out relaxing - and often when I'm on the phone that's what I'm doing instead of doodling or folding laundry. It's multi-tasking at it's finest!
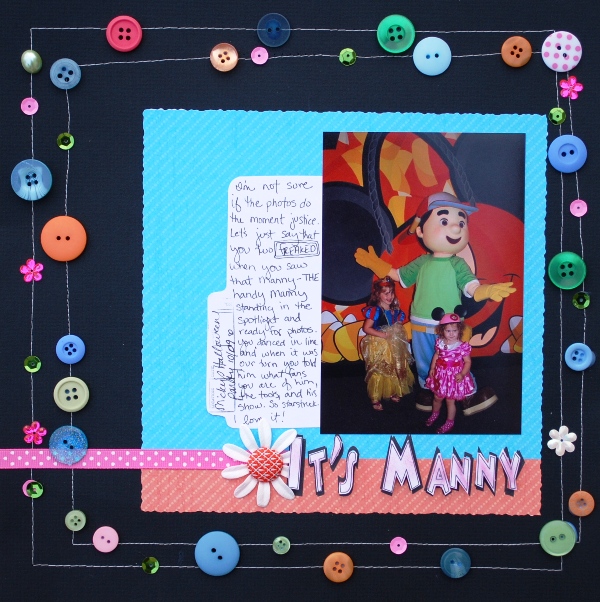
Supply List: Punky Monkey Digital Kit by Brandy Buffington, assorted buttons, thread, Tsukineko Brilliance Ink (Orchid), Basic Grey Nook & Pantry Stitched Brad, Mickey font, Offray ribbon, unknown cardstock.
Next up, it's Manny! For this I used a blockier font to show that if the thought of cutting cursive makes you woozy, you can just use letters that are more straight & easy. I think it took all of 5 minutes to cut this title out.


To make this page I printed out the papers (from Punky Monkey Digital Kit by Brandy Buffington) the sizes I wanted and added in the title over the orange strip. No Photoshop needed here - I used Microsoft Word and created a word art for the title! I then copied that word art and moved the second copy (without re-sizing it!) to the top of the page where I removed the black fill. Then I printed and cut out the title, as well as cutting out the 8x8 square of patterned paper with a deckle blade.
I cut almost everything with my trusty Fiskars Micro-Tip Scissors. They are spring-loaded and so they’re good to your hands. I’ve yet to find another pair of scissors that even comes close to being as good as these are.

I put the white copy of the title that I'd cut out over the black shadowed copy using foam adhesive. I then inked with pink to add a hit of color and completed my page.
Of course the possibilities are limited only by your own imagination. Hand-drawn titles, paper piecing, and so much more can be done with a few snips of your scissors. I hope you enjoy some creative time over this winter break and have fun with whatever you do!